

Time needed: 3 days.

What if you could set up an online lead generation system that ran by itself? A lead generation process that consistently brought in a steady stream of leads morning, noon and night, while you work and while you sleep?
With our automated online lead generation system you can do just that, and in this guide we’ll show you how to do it. We’ll talk you through the main steps involved in creating your very own automated online lead generation system, from lead magnet creation through to email automation.
Whatever your level of marketing experience or technical nous, this guide will provide you with the necessary tools to create a lead generation process that generates leads 7 days a week, 24 hours a day!
To set up this process, you will need certain pieces of software, namely a CRM, an email service and landing page software. For the purpose of this guide, our examples will be drawn from Zoho, MailChimp and Unbounce.

- The Lead Magnet
If you’ve been in marketing for any length of time, the chances are that you’ve heard of lead magnets. If you haven’t, or if you have and you’re not quite clear on what they are, then allow me to explain. A lead magnet is an entity created for the purpose of attracting leads. Often this will be in the form of a free download, but can range from a product trial to a training course.
The important thing is not the form of the lead magnet, but the value it provides to your target. The end goal of the lead magnet is to convince your target to part with their contact details in return for access to your offer. An individual’s contact details have value in and of themselves, so they’re unlikely to part with them if what you’re offering fails to provide equal or greater value.
Ultimately you and your team will have to sit down and think about what you can create or what you have to give away that will represent a fair exchange in the eyes of your target. The task is perhaps easiest for ecommerce businesses, who have a physical product to give away. For those of us you who don’t have physical products or free trials to offer, you can still provide genuine value to your target with your industry expertise. This is why white papers, webinars and training courses are so popular and work so well.
Ask yourself what information, what knowledge and expertise do you possess in your industry that your target audience will find valuable? Once you’ve figured that out, all you have to do is create it!
One final thing – the more effort you put into your lead magnet, the more value you offer to your target for free, the more information you can ask for in return. If you’re giving away a standard PDF cheat sheet, that’s fine, but you probably can’t expect to get more than an email address in exchange. If, however, you’re offering something highly valuable, such as a product trial, then you can quite reasonably ask for more information in return, such as company, website and phone number.
- The Landing Page
So you have your lead magnet, now you need a platform which allows your target to download or sign up for your offer. This platform is referred to as a ‘landing page’. A web page created for the specific purpose or driving sales or capturing information.
Creating a landing page may sound daunting, but it really, really isn’t. There are tons of user friendly landing page creation sites out there, which allow even the most technophobic marketers to create beautiful, custom web pages, which convert like a charm.
Unless you do happen to be particularly technical, or you have someone in your team who is, one of the best things you can do is to simply rework some of the many existing landing page templates hosted by Unbounce. The type of template you choose will be determined by the type of lead magnet you’re offering, and the type of information you are trying to acquire.
For a highly valuable offer, you might want to consider a lead generation template like the one below which asks for work email and company as well as name.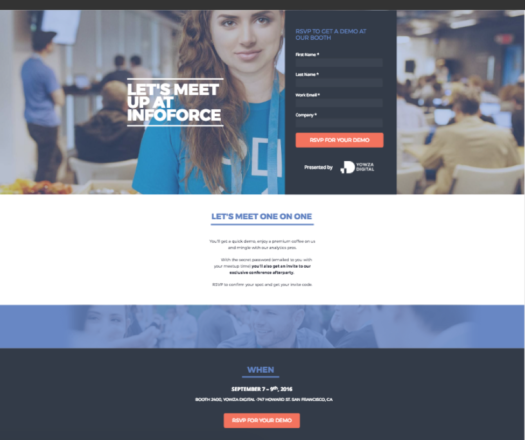
For something pitched a little lower, such as an e-book, you will probably have to content yourself with something like this, which only asks for an email for access to the offer.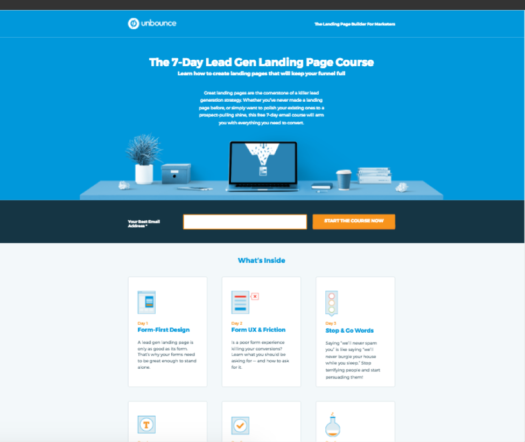
There are three elements to these landing pages: value proposition, CTA and visual media. For the next step, you need to customise these three elements to your offer.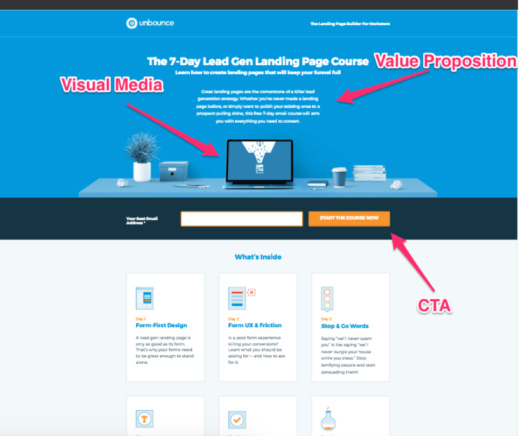
Value Proposition
The most important copy on the landing page is without doubt the value proposition. This is where you pitch your offer, explain how it can solve a problem relevant to the user and the unique benefits they can expect to enjoy when they download it or sign-up. The key to composing a good value proposition is clarity of meaning. That means avoiding buzzwords and jargon, and instead aiming to speak to your target in their language, and on their level.
CTA
The call-to-action is the action that you want the user to take: download, sign up, book your place. The key here is to make the copy clear, succinct (no more than five words) and powerful. Don’t overthink it, just decide what you want the user to do, and invoke that action with strong, compelling language.
Visual Media
If possible, you should always visualise your offer on your landing page. Once again, if you have a physical product to give away then this is much easier. Equally, if you’re giving away a free e-book then a nice a 3D book cover will do the trick. If your offer falls into neither of those two camps, then you might have to get a little creative, and think about how you can visualise the benefits of the offer, rather than the physical thing itself.
The most important part of any lead generation landing page is the form. This is where you capture the information that you’ll later use to turn that lead into an account.
Form
The good news is that if you’ve used one of the existing Unbounce templates editing the form fields is as simple as double clicking on the form itself. If you’ve decided to create a landing page from scratch, then just drag and drop one from the panel on the left.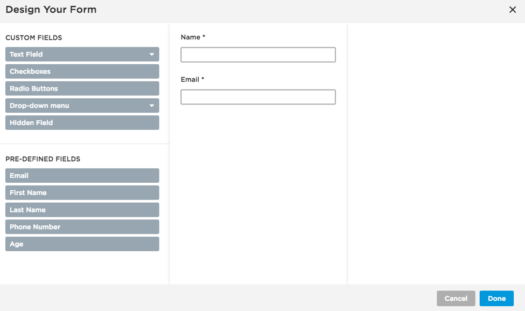
In the ‘Design Your Form’ box, you can choose precisely what fields you want the user to fill out. There are plenty of customisation options here, you can designate specific fields as ‘required’, edit field titles, move them up or down, or validate email addresses or phone numbers to ensure that people enter their correct details.
One of the most important fields in the form, that will NOT be pre-selected if you’ve used a template is the ‘Hidden Field’. Including a hidden field will be crucial later when it comes to setting up your automated emails. All you have to do for now is change ‘Field Name and ID’ to ‘download’ or ‘sign up’ or whatever is appropriate to your offer, and default value to the name of your lead magnet.
- Marketing Automation
After you’ve captured your lead, you will need a process in place to follow up and convert that lead into an account. There are many different approaches to this, but in terms of effectiveness and simplicity of use there really is no rival for an automated email campaign.
This isn’t an email marketing guide, but we will help you along the way to setting up your own email automation that you can integrate with your landing page and your CRM. Once you’ve done this, it really will be time to kick back, and watch those leads come rolling in.
Unbounce Integration
There are plenty of paid email services out there, and almost all of them will offer automation, but we prefer MailChimp. Not only is it easy to use, but it also integrates seamlessly with Unbounce.
The first thing you need to do is is create a mailing list in MailChimp. To do this simply click Lists>Create List and then Create List again. From here, fill out the requisite details and hit save.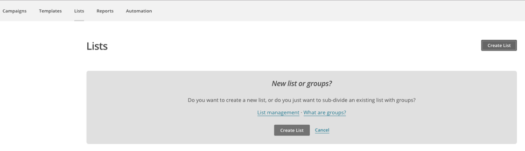
The next step is to integrate Mailchimp with Unbounce. This will ensure that all those juicy leads who are converting on your landing page are collected into your MailChimp list. To do this return to the overview level of your Unbounce account, scroll down to 3rd Party Integrations and click on MailChimp.
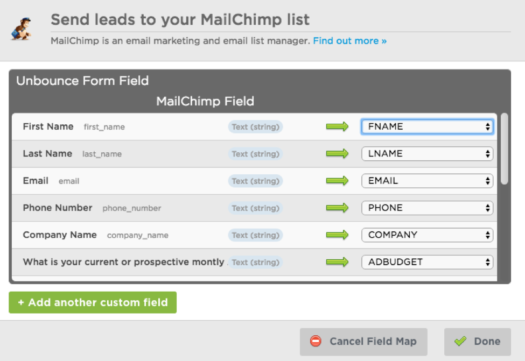
Next, from the dropdown box, select the email list you want to collect your leads on. Finally, you will need to ‘map’ the form fields from the landing page. This is the information that will populate from the Unbounce form field, into Mailchimp, as demonstrated in the two screenshots below.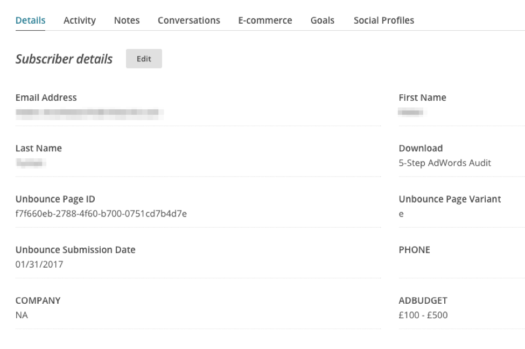
Email Automation
Now it’s time to create your first workflow. To do this, navigate to the MailChimp homepage and click Automation>Add Automation.
At this point you’ll be presented with a range of different automation options, from a simple welcome message to abandoned cart emails. For our purposes you want ‘Educate Subscribers’ in the ‘List Activity’ sub category. Now name your automation, and select the list you created earlier to collect your leads.
Now you have your automation in place, you need to think about what you want to do with it. The first email will almost always be to deliver the download, or to confirm an order or a sign up. What you do after that will depend entirely on you, and how you plan to convert that lead into an account. Whatever your strategy, automated emails will allow you to deliver your message, to a warm lead, at set times according to specific conditions. For example, you may want users who have ordered something for free, such as a makeup sample, to go onto buy the full price product.
In this scenario we would suggest the following triggers.
Email 1:
Intent: Acknowledge order
Subject Title: Thank You For Your Order
Trigger: Immediately after list field _____ changes to ____
Email 2:
Intent: Pitch full price product
Subject Title: If You Like x, You’ll Love This
Trigger: 5 days after subscribers are sent previous email (or however long delivery takes)
In Email 2, you can either send the user to a place on your website, or to another landing page. This is entirely up to you, but because of the integration options with MailChimp, using a landing page will allow you to segment your leads more effectively. For example, if you want to send a sequence of sales emails, you will want to avoid continuing to send emails to people who have already converted.
This can be done easily using MailChimp and Unbounce, by using the ‘Hidden Field’ text to create a segment in MailChimp. For example, if you wanted to send a third email, you could limit who receives that email by clicking edit segment>choose segment conditions>subscribers match the following conditions, and then using the ‘Hidden Field’ text to exclude people who signed up for the new offer.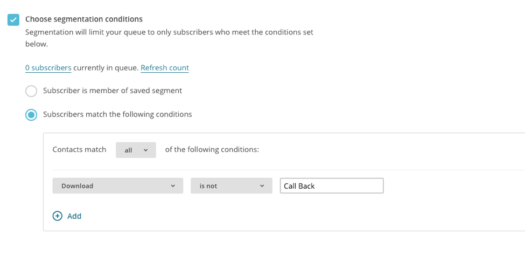
The design and content of the emails are beyond the scope of the guide, but the MailChimp interface is very user-friendly, and they have a number of different templates to help you out with this.
CRM Integration
The last thing we want to do to get our automation up and running is to integrate Unbounce with Zoho. This will enable you to record, manage, research and follow up on your hard earned leads. There are of course lots of other great CRMs available, but Zoho is what we prefer, so that’s the example we will use. If you do happen to use a different CRM, the integration process is unlikely to differ significantly from the process described below.
To integrate Zoho with Unbounce, we repeat the steps involved in integrating MailChimp. First, navigate to the overview level of Unbounce, and scroll down to ‘3rd Party Integrations’. Click Zoho, and check the box ‘trigger Zoho CRM workflow automation rules’. Next, just like with the MailChimp integration, go ahead and map the appropriate information to the relevant field forms. Whatever field forms you’ve included on your landing page form, you now need to map to Zoho.
Finally, we want to set up a couple of workflows in Zoho itself. This will streamline the automation process, and will allow you and your team to manage your leads more effectively. This process will be imperative if you are working with a big budget, and you are anticipating a large volume of leads.
What we want to do here is create notifications when a certain lead criteria is met. For example, you could choose to create a notification for when a lead is generated from a particular campaign, or you could get more granular and set up notifications for leads with a particular budget, or a certain number of employees.
To do this, click the tools symbol in the top right of the Zoho home screen and then click ‘Setup’. In the following screen you want ‘Workflow Rules’ in the ‘Automation’ category.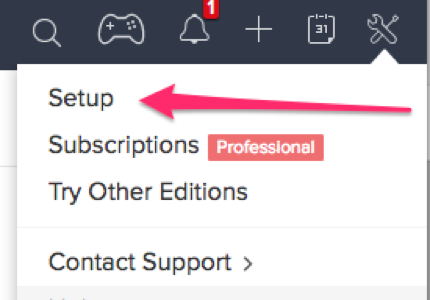
Now it’s time to create a rule. Click the blue ‘Create Rule’ button, and under ‘Module’ select ‘Leads’, and then give the rule an appropriate rule name and description. For ‘When do you want to execute this rule?’, click ‘on a record action’, then ‘create’, then ‘next’.
Now you have to choose a trigger for your rule. This will depend on what notifications you want to receive, which in turn will depend on what type of information you are recording, and what type of follow up strategy you have in place. The drop down box shows you the extent of options available to you, from ‘No. of Employees’ to ‘Lead Source’. If, for example, you were running a small lead generation campaign, and wanted to receive a notification every time a new lead was generated, you would go ahead and choose ‘Lead Source’. Next, click ‘is’ and then choose the lead source, which you will have specified earlier in the ‘Hidden Field’ of the signup form.
Click save, and finally, you’re done. Now, your workflow is up and running. You have a lead generation page, a lead magnet to give away, a series of automated emails which will be triggered as soon as the lead magnet is download or signed up for, all of which is automated to be synced into your CRM, with notifications set-up when certain conditions are met.
Now, all you need is some traffic! - Driving Traffic
Driving traffic is perhaps the most important element in this process, after all, it doesn’t matter how good your lead magnet is, if you can’t drive any traffic to it, no one will even know it exists.
The good news is that driving traffic to your lead magnet is also the easiest part of this process. There are millions of people on social media and Google who need what you’re offering. All you need to do is to pay those companies – Twitter, Google, Facebook – for the privilege of reaching your target audience!
In the final part of this guide, we will take you through the main digital marketing platforms, and will explain some of their respective strengths and weaknesses. Only you can decide which is the right platform for your lead generation campaign, and hopefully what follows will provide you with the foundation to do just this.
Social Media Advertising
Social media advertising generally constitutes advertising on the three main social media platforms: Facebook, Twitter and LinkedIn. This type of advertising is capable of delivering a tangible ROI very quickly and can be a great way of driving relevant traffic to your lead magnet.
Choosing which social media platform is right for you will depend entirely on the nature of your lead magnet, and the type of lead you are trying to target.
Twitter has a broad appeal, and its keyword focussed advertising can be hugely effective for the right lead magnet. For example, you can display ads to people who tweet a certain keyword. If your lead magnet is related to a hot topic that a lot of people are tweeting about, such as Brexit, then Twitter advertising could be the right fit for you.
LinkedIn is the most expensive of the three platforms, but in return for your outlay you are able to target individuals based on their professional attributes. This makes LinkedIn the perfect platform if you’re targeting your lead magnet at a certain type of business, sector or profession.
Generally speaking, our favourite social advertising platform is Facebook Ads.
It’s an oft-quoted stat, but if Facebook were a country, it’s 1.2 billion users would make it the largest in the world.
Using Facebook advertising you can create highly targeted ads, based upon key demographics such as income and occupation. The wealth of data at Facebook’s disposal makes it a marketer’s dream, and you can draw on this information to advertise your lead magnet to your ideal target.
Paid Search Advertising
Paid search advertising, otherwise known as SEM (search engine marketing), or, more commonly, PPC (pay-per-click), consists of advertising on and across the major search engine platforms. The biggest appeal of paid search is that it allows you to gain high visibility in search engine results without the need for a high ranking website. The most popular paid service is Google Ads, Google’s own advertising service which allows you to advertise not only in the Google search engine results but across its vast network of partner websites.
The Google Ads system is built around ‘keywords’ – words and phrases which users might use to enter a search query into Google. The key to success with Google Ads is effective keyword research. If the right keywords are targeted, if the sweet spot between high search volume and low competition can be met, then you will be able to drive high volumes of relevant traffic to your landing page at a really competitive cost.


And that’s it!
If you made it to the end of this guide you now have the knowledge to go ahead and create your very own automated online lead generation system, from start to finish.
All you have to do now is build it!
Thank you for taking the time to read this guide. If you’d like help building your own lead generation system give us a call on 01603 343477.